Tuesday, December 18, 2012

HowTo - [Gentoo] Apply a patch to sources using ebuild

1. Locate the ebuild file, for example, libdrm-2.4.31.ebuild.

$ ls /usr/portage/x11-libs/libdrm/libdrm-2.4.31.ebuild

2. Digest, fetch, unpack

$ sudo ebuild /usr/portage/x11-libs/libdrm/libdrm-2.4.31.ebuild digest
$ sudo ebuild /usr/portage/x11-libs/libdrm/libdrm-2.4.31.ebuild fetch
$ sudo ebuild /usr/portage/x11-libs/libdrm/libdrm-2.4.31.ebuild unpack

3. The unpacked source file would be in the /tmp folder. You might need to switch to super user to access that folder.


$ sudo su
# cd /var/tmp/portage/x11-libs/libdrm-2.4.31/work/libdrm-2.4.31/
# patch -p1 < patch1.patch
...
# exit

4. Compile, install and qmerge

$ sudo ebuild /usr/portage/x11-libs/libdrm/libdrm-2.4.31.ebuild compile
$ sudo ebuild /usr/portage/x11-libs/libdrm/libdrm-2.4.31.ebuild install
$ sudo ebuild /usr/portage/x11-libs/libdrm/libdrm-2.4.31.ebuild qmerge

The generated executable file will replace the original ones. Patch applying finished. 

Tuesday, September 11, 2012

HowTo - Compile Linux kernel 3.5 under Ubuntu 12.04


1. Dependencies


$ sudo apt-get install gcc libncurses5-dev git-core kernel-package fakeroot build-essential

$ sudo apt-get update && sudo apt-get upgrade


2. Download kernel source


$ wget http://www.kernel.org/pub/linux/kernel/v3.x/linux-3.5.tar.bz2

$ tar -xvf linux-3.5.tar.bz2

$ cd linux-3.5/


3. Compile


If you want to use your current kernel configuration:

$ cp /boot/config-`uname -r` ./.config

$ make menuconfig

Compile the kernel and modules to be .deb packages so that we can easily install/uninstall them.

$ make-kpkg clean

$ fakeroot make-kpkg --initrd --append-to-version=-spica kernel_image kernel_headers


4. Install


Now you have two .deb packages generated, one is to install the kernel headers, another one is to install the kernel image. 

$ sudo dpkg -i linux-*.deb


5. Reboot


During reboot, choose the new kernel in your grub menu. Once you finish rebooting, check your new kernel information by typing in:

$ uname -r

Saturday, July 21, 2012

KVM VFIO

1. Download source

1.1 Download linux-vfio kernel source
$ git clone git://github.com/awilliam/linux-vfio.git
1.2. Download qemu-vfio
$ git clone git://github.com/awilliam/qemu-vfio.git iommu-group-vfio

2. Compile and install

2.1 Compile qemu
$ ./configure --prefix=/usr
$ make
$ sudo make install

2.2 Compile kernel
# make menuconfig
IMPORTANT: Mark VFIO related options as , which means make them removable modules, not builtin modules. (Because you might need to reload them in the future.)
# make
# make modules_install install

3. Run kvm 

Start kvm with usual command plus :
# kvm ... -device vfio-pci,host=01:00.0,id=hostdev0

Error:
Failed to set iommu for container: Operation not permitted Failed to setup container for group 1

Solution[1]:
Check dmesg, it's probably complaining about no interrupt remapping support. If so:
# modprobe -r vfio_iommu_type1
# modprobe vfio_iommu_type1 allow_unsafe_interrupts=1

[1] http://www.mail-archive.com/kvm@vger.kernel.org/msg73068.html

Thursday, July 19, 2012

HowTo - KVM Passthrough

1. Install Qemu-KVM [1]

1.1 Enable the virtualization setting in the BIOS first.

1.2 Check KVM installation environment.
$ sudo apt-get update

$ sudo apt-get install cpu-checker

$ sudo modprobe kvm_intel

$ sudo modprobe kvm
$ kvm-ok

1.3 If everything is okay, you can install the qemu-kvm packages.
$ sudo apt-get install qemu-kvm libvirt-bin ubuntu-vm-builder bridge-utils

$ sudo adduser `id -un` libvirtd

$ sudo chmod 777 /var/run/libvirt/libvirt-sock

$ sudo chown root:libvirtd /dev/kvm

$ virsh -c qemu:///system list

1.4 If the command below shows you an empty list of virtual machines, the installation is successful. You may now install the virt-manager. which is the GUI tool for KVM.
$ sudo apt-get install virt-manager

2. Enable IOMMU support

$ sudo vi /etc/default/grub
  • Add intel_iommu=on in GRUB_CMDLINE_LINUX_DEFAULT parameter.
$ sudo update-grub

$ sudo reboot

You can verify the IOMMU support by type in
$ dmesg | grep -e DMAR -e IOMMU

If you are using an Intel machine. For AMD, check here.

3. Modify KVM kernel [2]

I skipped this step.

4. Verify the PCI that you need to attach to the virtual machine.

$ lspci

Suppose we are interested in passing through this device
20:00.0 VGA compatible controller: Advanced Micro Devices [AMD] nee ATI Caicos [Radeon HD 6450]

which is a PCI-Express Graphics Card. This PCI device 20:00.0 will be the example device in the following steps.

$ lspci -n
...
20:00.0 0300: 1002:6779
...

Note down the device ID 1002:6779 .

5. Unbind and bind

5.1 Load the PCI stub module.
$ sudo modprobe pci_stub
5.2 Unbind the device from the host kernel driver, and bind it with pci stub.
# echo "1002 6779" > /sys/bus/pci/drivers/pci-stub/new_id
# echo 0000:20:00.0 > /sys/bus/pci/devices/0000\:20\:00.0/driver/unbind
# echo 0000:20:00.0 > /sys/bus/pci/drivers/pci-stub/bind

6. Assign device
Add extra parameters as below after the usual kvm command.

$ kvm ... -device pci-assign,host=20:00.0

If you see errors, check the following section.

7. Necessary permission modifications [3]

According to my experience, you might encounter an error saying:
Device 'pci-assign' could not be initialized.

Before you try any solution, first make sure that modules such as kvm, kvm_intel, pci_stub are loaded. Also make sure that intel_iommu=on is in your grub configuration file (even if you see IOMMU from dmesg, it doesn't ensure that INTEL_IOMMU is enabled).

The command that fixed it was:
# echo 1 > /sys/module/kvm/parameters/allow_unsafe_assigned_interrupts

But I did try something else before the command above, so I suppose that if this command doesn't work, try the following:
# vi  /etc/libvirt/qemu.conf

Uncomment and set user and group to "root".
Set clear_emulator_capabilites = 0 .
Set relaxed_acs_check = 1 .

Besides, if you are using a RPM-based system such as Fedora, you also need to set SELinux to  permissive.

Then run kvm under root.
# kvm ... -device pci-assign,host=20:00.0


8. Done.

In the guest OS, run lspci, and check if you can see the assigned pci device there.


[1] https://help.ubuntu.com/community/KVM/Installation
[2] http://www.linux-kvm.org/page/How_to_assign_devices_with_VT-d_in_KVM
[3] http://comments.gmane.org/gmane.comp.emulators.libvirt.user/2945

Friday, July 13, 2012

Android wireless-tools


1. Download wireless_tools.30.pre9.tar.gz from 
www.hpl.hp.com/personal/Jean_Tourrilhes/Linux/Tools.html 
This version supports non-ASCII char in ESSID.

2. Unpack it into mydroid/external/wireless-tools directory.

3. Create Android.mk file with the following content:

LOCAL_PATH:= $(call my-dir)
################## build iwlib ###################
include $(CLEAR_VARS)
LOCAL_SRC_FILES := iwlib.c
LOCAL_CFLAGS += -Wstrict-prototypes -Wmissing-prototypes -Wshadow -Wpointer-arith -Wcast-qual -Winline -MMD -fPIC
LOCAL_MODULE:= libiw
LOCAL_STATIC_LIBRARIES := libcutils libc libm
include $(BUILD_STATIC_LIBRARY)
################## build iwconfig ###################
include $(CLEAR_VARS)
LOCAL_SRC_FILES := iwconfig.c
LOCAL_CFLAGS += -Wstrict-prototypes -Wmissing-prototypes -Wshadow -Wpointer-arith -Wcast-qual -Winline -MMD -fPIC
LOCAL_MODULE:= iwconfig
LOCAL_STATIC_LIBRARIES := libcutils libc libm libiw
#LOCAL_FORCE_STATIC_EXECUTABLE := true
LOCAL_MODULE_PATH := $(TARGET_OUT_OPTIONAL_EXECUTABLES) # install to system/xbin
#LOCAL_UNSTRIPPED_PATH := $(TARGET_ROOT_OUT_UNSTRIPPED)
#LOCAL_MODULE_TAGS := eng user
include $(BUILD_EXECUTABLE)
################## build iwlist ###################
include $(CLEAR_VARS)
LOCAL_SRC_FILES := iwlist.c iwlib.h
LOCAL_CFLAGS += -Wstrict-prototypes -Wmissing-prototypes -Wshadow -Wpointer-arith -Wcast-qual -Winline -MMD -fPIC
LOCAL_MODULE:= iwlist
LOCAL_STATIC_LIBRARIES := libcutils libc libm libiw
#LOCAL_FORCE_STATIC_EXECUTABLE := true
LOCAL_MODULE_PATH := $(TARGET_OUT_OPTIONAL_EXECUTABLES) # install to system/xbin
#LOCAL_UNSTRIPPED_PATH := $(TARGET_ROOT_OUT_UNSTRIPPED)
#LOCAL_MODULE_TAGS := eng user
include $(BUILD_EXECUTABLE)

4. Modify it as follows:
4.1 Change  wireless.22.h to be wireless.h ;
4.2 Modify ifrename.c, add a getline() function. You can get the code from external/genext2fs/genext2fs.c ;
Notice that this file uses macro to pass another function to getline() .
4.3 Modify iwlib.h ,  change #include to be #include .
[I don't know what it means. -- spica]

5. Compile

qiu@qiubutu:~/eclair-21/external/wireless-tools$ . ../../build/envsetup.sh
qiu@qiubutu:~/eclair-21/external/wireless-tools$ mm
============================================
PLATFORM_VERSION_CODENAME=REL
PLATFORM_VERSION=2.1-update1
TARGET_PRODUCT=generic
TARGET_BUILD_VARIANT=eng
TARGET_SIMULATOR=
TARGET_BUILD_TYPE=release
TARGET_ARCH=arm
HOST_ARCH=x86
HOST_OS=linux
HOST_BUILD_TYPE=release
BUILD_ID=ECLAIR
============================================
make: Entering '/home/qiu/eclair-21'
target thumb C: iwconfig <= external/wireless-tools/iwconfig.c
In file included from external/wireless-tools/iwlib.h:25,
                 from external/wireless-tools/iwlib-private.h:19,
                 from external/wireless-tools/iwconfig.c:14:
bionic/libc/include/stdlib.h:84: warning: declaration of 'abs' shadows a built-in function
bionic/libc/include/stdlib.h:88: warning: declaration of 'labs' shadows a built-in function
bionic/libc/include/stdlib.h:92: warning: declaration of 'llabs' shadows a built-in function
target thumb C: libiw <= external/wireless-tools/iwlib.c
In file included from external/wireless-tools/iwlib.h:25,
                 from external/wireless-tools/iwlib-private.h:19,
                 from external/wireless-tools/iwlib.c:14:
bionic/libc/include/stdlib.h:84: warning: declaration of 'abs' shadows a built-in function
bionic/libc/include/stdlib.h:88: warning: declaration of 'labs' shadows a built-in function
bionic/libc/include/stdlib.h:92: warning: declaration of 'llabs' shadows a built-in function
target StaticLib: libiw (out/target/product/generic/obj/STATIC_LIBRARIES/libiw_intermediates/libiw.a)
target Executable: iwconfig (out/target/product/generic/obj/EXECUTABLES/iwconfig_intermediates/LINKED/iwconfig)
target Non-prelinked: iwconfig (out/target/product/generic/symbols/system/bin/iwconfig)
target Strip: iwconfig (out/target/product/generic/obj/EXECUTABLES/iwconfig_intermediates/iwconfig)
Install: out/target/product/generic/system/xbin/iwconfig
target thumb C: iwlist <= external/wireless-tools/iwlist.c
In file included from external/wireless-tools/iwlib.h:25,
                 from external/wireless-tools/iwlib-private.h:19,
                 from external/wireless-tools/iwlist.c:14:
bionic/libc/include/stdlib.h:84: warning: declaration of 'abs' shadows a built-in function
bionic/libc/include/stdlib.h:88: warning: declaration of 'labs' shadows a built-in function
bionic/libc/include/stdlib.h:92: warning: declaration of 'llabs' shadows a built-in function
target Executable: iwlist (out/target/product/generic/obj/EXECUTABLES/iwlist_intermediates/LINKED/iwlist)
target Non-prelinked: iwlist (out/target/product/generic/symbols/system/bin/iwlist)
target Strip: iwlist (out/target/product/generic/obj/EXECUTABLES/iwlist_intermediates/iwlist)
Install: out/target/product/generic/system/xbin/iwlist
make: Leaving “/home/qiu/eclair-21”

6. Copy files to the system
qiu@qiubutu:~/eclair-21/external/wireless-tools$ croot
qiu@qiubutu:~/eclair-21$ cp out/target/product/generic/system/xbin/iwconfig /nfs/rootfs/system/xbin/iwconfig
qiu@qiubutu:~/eclair-21$ cp out/target/product/generic/system/xbin/iwlist /nfs/rootfs/system/xbin/

7.Test
After starting Android:

# modprobe libertas
# modprobe libertas_sdio
libertas_sdio: Libertas SDIO driver
libertas_sdio: Copyright Pierre Ossman
model=0xb
sd8686_helper.bin sd8686.bin
init: untracked pid 853 exited
init: untracked pid 856 exited
libertas: eth1: Marvell WLAN 802.11 adapter
# iwconfig eth1                
eth1      IEEE 802.11b/g  ESSID:"Antrose-11g"
          Mode:Managed  Frequency:2.437 GHz  Access Point: 00:15:E9:0C:87:7C
          Bit Rate:1 Mb/s   Tx-Power=13 dBm
          Retry limit:8   RTS thr=2347 B   Fragment thr=2346 B
          Encryption key:off
          Power Management:off
          Link Quality=83/100  Signal level=-60 dBm  Noise level=-93 dBm
          Rx invalid nwid:0  Rx invalid crypt:0  Rx invalid frag:1441
          Tx excessive retries:44  Invalid misc:11220   Missed beacon:0
# iwlist scan
eth1      Scan completed :
          Cell 01 - Address: 00:22:6B:8C:5D:3A
                    ESSID:"Antrose-11g"
                    Mode:Managed
                    Frequency:2.412 GHz (Channel 1)
                    Quality=65/100  Signal level=-78 dBm  Noise level=-96 dBm
                    Encryption key:off
                    Bit Rates:1 Mb/s; 2 Mb/s; 5.5 Mb/s; 11 Mb/s; 18 Mb/s
                              24 Mb/s; 36 Mb/s; 54 Mb/s; 6 Mb/s; 9 Mb/s
                              12 Mb/s; 48 Mb/s
# iwconfig eth1 essid Antrose-11g
# iwconfig eth1                
eth1      IEEE 802.11b/g  ESSID:"Antrose-11g"
          Mode:Managed  Frequency:2.437 GHz  Access Point: 00:15:E9:0C:87:7C
          Bit Rate:1 Mb/s   Tx-Power=13 dBm
          Retry limit:8   RTS thr=2347 B   Fragment thr=2346 B
          Encryption key:off
          Power Management:off
          Link Quality=83/100  Signal level=-60 dBm  Noise level=-93 dBm
          Rx invalid nwid:0  Rx invalid crypt:0  Rx invalid frag:1441
          Tx excessive retries:44  Invalid misc:11220   Missed beacon:0

Done.

Wednesday, July 11, 2012

HowTo - Using Perf KVM to trace KVM

1. From guest OS: (Android-x86 for example)

$ cat /proc/kallsyms > /sdcard/guest.kallsyms
$ cat /proc/modules > /sdcard/guest.modules

2. Pull out the two files above via adb.

3. On the host OS:

3.1 Record

# perf kvm --host --guest --guestkallsyms=guest.kallsyms --guestmodules=guest.modules record -a

(The record will be saved to perf.data.kvm file under current directory.)

3.2 Report

# perf kvm --host --guest --guestkallsyms=guest.kallsyms --guestmodules=guest.modules report -i perf.data.kvm


Ref:

Error: adb unable to connect xxx.xxx.xxx.xxx:5555

I had this problem when I tried to adb connect to the virtual phone in KVM. You might also have this problem using the emulator.


Solution:

Step 1. Don't panic, if you have tried methods like "setprop service.adb.tcp.port 5555, stop adbd, start adbd", which didn't work.

Step 2: In the phone terminal, type

# adb remount

Step 3: Try connecting again.

$ adb kill-server
$ adb connect xxx.xxx.xxx.xxx
  ...
  xxx.xxx.xxx.xxx (hopefully) connected.

Step 4: Problem solved.

Tuesday, July 10, 2012

HowTo - Using Simple Tracing in Qemu-KVM


You need to build your own version of Qemu-KVM. Download the qemu-kvm source file.

git clone git://git.kernel.org/pub/scm/virt/kvm/qemu-kvm.git

1. Build qemu-kvm with the 'simple' trace backend: 


$ ./configure --enable-trace-backend=simple && 
   make 

2. Create a file with the events you want to trace: 

$ echo bdrv_aio_readv > /tmp/events 
$ echo bdrv_aio_writev >> /tmp/events 

3. Run the virtual machine to produce a trace file: 

$ kvm -trace events=/tmp/events ... # your normal QEMU invocation 

4. Pretty-print the binary trace file at: 

 ~/qemu-kvm/scripts/simpletrace.py trace-events trace-*


Ref: http://repo.or.cz/w/qemu/stefanha.git/blob_plain/refs/heads/tracing:/docs/tracing.txt

Monday, July 9, 2012

HowTo - Using KVM default tracing tool


1. Install trace-cmd 

The source can be found in the kvm source file home directory. 

2. Suppose you are interested in i/o events, type in:

$ sudo trace-cmd record -e '*io*' virsh 

You can start your virtual machine in virsh. 

3. Use kernelshark to read the record.

$ kernelshark

Friday, July 6, 2012

Tips - Android-x86 virt-manager settings

Q: Can't write to disk?
A: Make the Disk to be IDE mode before installation.


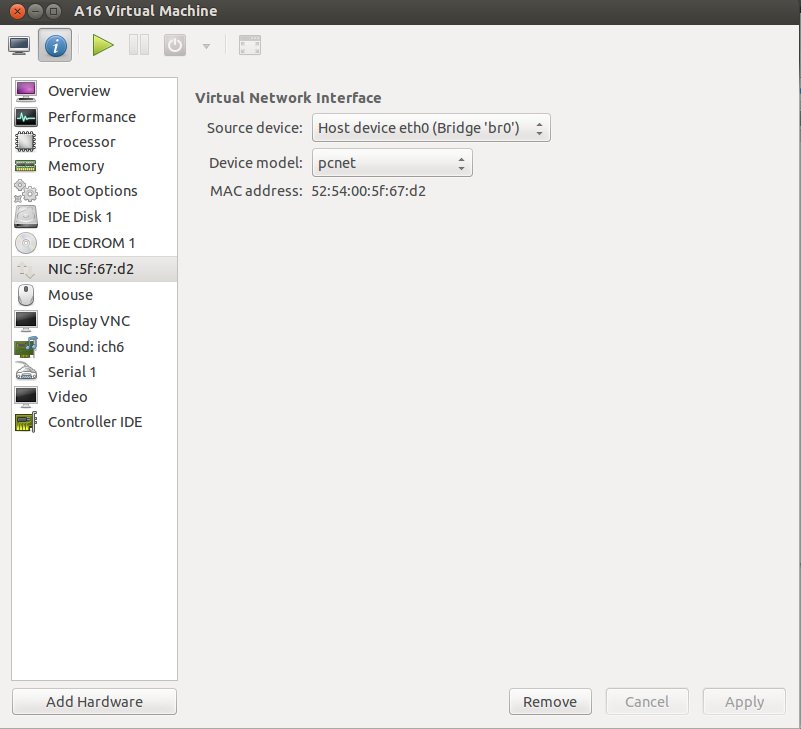
Q: Guest OS (Android-x86) no eth0 interface?
A: Set the Network Device Model to be pcnet.


Tuesday, July 3, 2012

HowTo - Porting Android-x86 onto Qemu-KVM

Before you start, you need to install a lot of packages.  Please refer to

https://help.ubuntu.com/community/KVM/Installation

Generating a new virtual machine:

1. Create a file for storing Android-x86 disk image.

$ qemu-img create android-4.0.img 4G


2. Install the system from the cd image (the iso file).
$ kvm -m 2047 -cdrom your_iso_file.iso -hda android-4.0.img -boot d

Install the os to the disk as usual.

After creating a faked SD, do not reboot. Shut down the window.

4. Start the virtual machine.
$ sudo kvm -m 2047 -hda android-4.0.img -net nic,model=pcnet -net tap

For the file size, the numbers matter, so don't be stingy. 

Notice the net model should be pcnet and the second net should be tap. Tap requires root privilege. 

If you don't have a public bridge yet, you need to set up one first. Please refer to 


Briefly, if you are using Ubuntu, the network configuration can be done by doing the follows: (on the host)

# vi /etc/network/interfaces

# Replace old eth0 config with br0
auto eth0 br0
# Use old eth0 config for br0, plus bridge stuff
iface br0 inet dhcp
    bridge_ports    eth0
    bridge_stp      off
    bridge_maxwait  0
    bridge_fd       0
# /etc/init.d/networking restart


On the guest because you are actually using a virtual eth0 device, you need to modify your /etc/network/interfaces file to configure eth0. 


Thursday, June 14, 2012

HowTo - Using Git behind a Proxy

1. $ sudo aptitude install corkscrew

2. Create a file named “git-proxy” in $HOME/bin director which includes following content:

#!/bin/sh
exec /usr/bin/corkscrew $*

3. $ git config --global core.gitproxy '$HOME/bin/git-proxy'

Wednesday, June 6, 2012

Error: Encountered a section with no Package: header, E:Problem with MergeList


$ sudo rm /var/lib/apt/lists/* -vf

$ sudo apt-get update


HowTo - Installing Ubuntu from External Hard Drive

1. Make a separate partition on your external hard drive. Format it to be FAT32.


2. Set the partition as Active (In storage management)


3. Use universal-usb-installer

4. Boot 

5. Choose boot source. Press F12 if you are using ThinkPad Edge laptop.

6. Install Ubuntu

6.1 Manual partition

6.1.1 Choose a free space

6.2.2 Add a partition for /
6.2.3 Add a partition for swap
6.2.4 Add a partition for /home

7. Reboot


9. Done!

Sunday, May 13, 2012

HowTo - Porting Android 4.0 ICS onto x86 VirtualBox


Thanks to Android-x86 community.

1. Build environment

1.1 Install Java JDK 7 [1]
(1) Download Java JDK 7
(2) Unzip, rename as java-7-oracle
(3) Move it to /usr/lib/jvm
(4) Use this tool to change the system Java version to java-7-oracle

$ wget http://webupd8.googlecode.com/files/update-java-0.5b 
$ chmod +x update-java-0.5b
$ bash update-java-0.5b

1.2 Install required packages (Ubuntu 12.04) [2]

$ sudo apt-get install git-core gnupg flex bison gperf build-essential \
  zip curl libc6-dev libncurses5-dev:i386 x11proto-core-dev \
  libx11-dev:i386 libreadline6-dev:i386 libgl1-mesa-dev:i386 \
  g++-multilib mingw32 openjdk-6-jdk tofrodos python-markdown \
  libxml2-utils xsltproc zlib1g-dev:i386 libxext-dev:i386 lib32ncurses5-dev

2. Build the image

2.1 Download Android-x86 source file [3]

$ mkdir android-x86
$ cd android-x86
$ repo init -u http://git.android-x86.org/manifest -b ics-x86
$ repo sync

*ics-x86 is based on Android 4.0 release. If the above link fails, try git://android-x86.git.sf.net/gitroot/android-x86/x86/platform/manifest.git -b

2.2 Build

$ bash
$ source build/envsetup.sh
$ lunch

Choose eeepc-eng as target product (that is the only thing that compiles through).

$ m -j16 iso_img

*16 is the number of parallel threads which can be determined by cpu info.

2.3. Locate the generated image at

out/target/product/eeepc/eeepc.iso

3. Download and run VirtualBox

3.1 Configurations: [4]
  • OS Type: Linux 2.6
  • Base Memory: At least 256MB, 512MB is better.
  • CD/DVD-ROM image: eeepc.iso
3.2 Start
On the boot menu, select the VESA mode item. 
3.3 Usage [5]

4. Alternative option

For VirtualBox Android, try BuilDroid. It has a faked Wi-Fi connection, making things much easier.

Check my test on VirtualBox here.

Friday, May 11, 2012

Error: No grub Menu after Installing Ubuntu


sudo update-grub

If that doesn't solve the problem, run sudo grub-install /dev/sda (if you get an error, replace sda with hda), and then run sudo update-grub


http://askubuntu.com/questions/127666/no-grub-menu-for-11-10-and-12-04lts

Tuesday, April 24, 2012

HowTo - Building Android ICS from Source

1. Download the Source via git

$ git://github.com/CyanogenMod/android.git -b gingerbread

I personally recommend CyanogenMod version, because it was the only version that worked for me.

2. Obtaining hardware-related proprietary binaries (important)

3. Build *

$ bash
$ source build/envsetup.sh
$ lunch
$ make -j4

4. Flash the device

$ adb reboot bootloader
$ fastboot flashall -w

---

* Possible error:

make: *** No rule to make target `vendor/cyanogen/proprietary/RomManager.apk', needed by `out/target/product/galaxys/system/app/RomManager.apk'. Stop.

Solution:

Step 1. Don't panic.

Step 2. Type in

$ cd vendor/cyanogen 
$ ./get-rommanager 

Step 3. Problem Solved.


Monday, April 9, 2012

HowTo - Building Android kernel modules (bcm4329.ko)


This document tells us how to build individual modules instead of compiling the whole kernel. 

bcm4329.ko is the wireless driver module for Google Nexus One. It is located in the kernel files. 

Under kernel directory:

1. Include the arm-eabi- tool directory into the path.

$ export PATH=$PATH:~/android/prebuilt/linux-x86/toolchain/arm-eabi-4.4.3/bin/

2. Generate the configuration file.

2.1 Use herring_defconfig as the default configuration file.

$ make ARCH=arm herring_defconfig

2.2 Modify the configuration file.

vi .config

Make changes as follows:

CONFIG_CROSS_COMPILE = "arm-eabi-"
CONFIG_LOCAL_VERSION = "-cyanogenmod"
#CONFIG_LOCALVERSION_AUTO
set all CONFIG_BCM* to m

3. Change another file (and I don't know why)

$ vi scripts/setlocalversion
Locate the following line

if $short; then
echo "+"

and change echo "+" to echo ""

5. Set building architecture to be arm.

$ export ARCH=arm

6. Make.

$ make modules

7. Push the new module into the phone.

7.1 Remount to be writable.
  
$ adb remount

7.2 Push.

adb push drivers/net/wireless/bcm4329/bcm4320.ko /system/modules


Ref: http://stevechui.blogspot.com/2011/10/compiling-kernel-modules-tunko-for.html

Tuesday, April 3, 2012

HowTo - ssh, sftp, scp

Download from remote server:
$ sftp username@server.com
$ get filename


Upload to remote server: *
$ sudo scp filename username@server.com

SCP a file to Duke CS my home directory
$ sudo scp filename username@server.com:~/
(Don't forget the ~)


* You might have this error:

Error: scp permission denied

Solution:

Step 1. Don't panic.

Step 2. Use sudo before scp.

Step 3. Make sure the remote file folder's permission mode is okay such as:

$ sudo chmod 777 -R filefolder/
Step 4. Problem Solved.

http://support.cs.utah.edu/index.php?option=com_content&view=article&id=33&Itemid=59
http://www.cs.duke.edu/courses/fall10/cps216/TA_Material/git.txt

Thursday, March 29, 2012

HowTo - Building Android Kernel


Again I personally recommend CyanogenMod version.

Partly referred to : http://wiki.cyanogenmod.com/wiki/Building_Kernel_from_source

Notice: Kernel Source Code is : https://github.com/CyanogenMod/samsung-kernel-crespo

configure file: herring_defconfig

Unpack original image, pack new image: http://forums.androidcentral.com/t-mobile-nexus-s-rooting-roms-hacks/48675-how-compile-nexus-s-kernel-source.html

Notice: Don't use the image pulled from the device, use the one in the installation zip file.

Copy 
~/android/kernel/samsung-kernel-crespo/drivers/net/wireless/bcm4329/bcm4329.ko 
into /system/modules/