Showing posts with label Android-x86. Show all posts

Wednesday, July 11, 2012

HowTo - Using Perf KVM to trace KVM

1. From guest OS: (Android-x86 for example)

$ cat /proc/kallsyms > /sdcard/guest.kallsyms
$ cat /proc/modules > /sdcard/guest.modules

2. Pull out the two files above via adb.

3. On the host OS:

3.1 Record

# perf kvm --host --guest --guestkallsyms=guest.kallsyms --guestmodules=guest.modules record -a

(The record will be saved to perf.data.kvm file under current directory.)

3.2 Report

# perf kvm --host --guest --guestkallsyms=guest.kallsyms --guestmodules=guest.modules report -i perf.data.kvm


Ref:

Error: adb unable to connect xxx.xxx.xxx.xxx:5555

I had this problem when I tried to adb connect to the virtual phone in KVM. You might also have this problem using the emulator.


Solution:

Step 1. Don't panic, if you have tried methods like "setprop service.adb.tcp.port 5555, stop adbd, start adbd", which didn't work.

Step 2: In the phone terminal, type

# adb remount

Step 3: Try connecting again.

$ adb kill-server
$ adb connect xxx.xxx.xxx.xxx
  ...
  xxx.xxx.xxx.xxx (hopefully) connected.

Step 4: Problem solved.

Friday, July 6, 2012

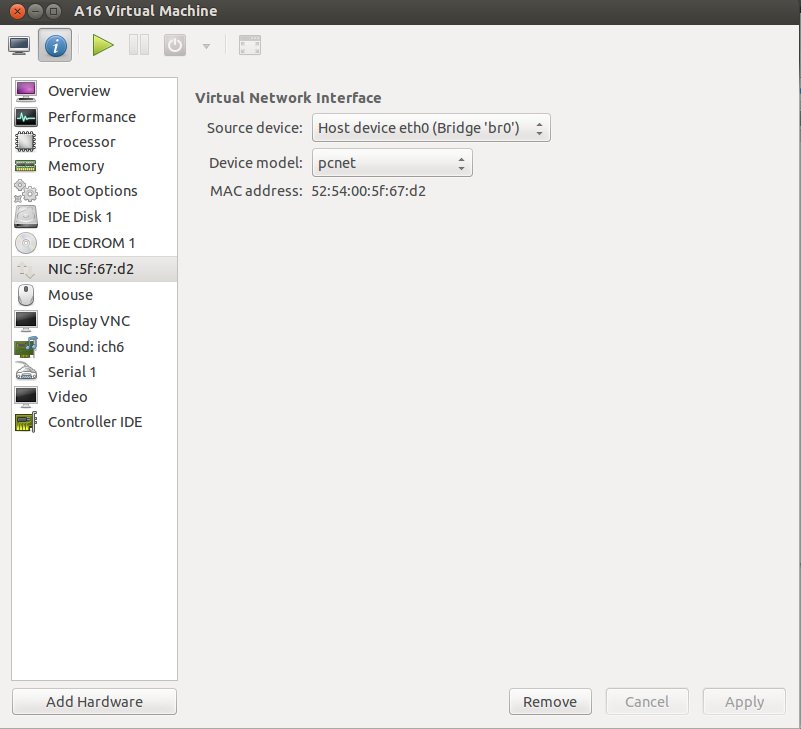
Tips - Android-x86 virt-manager settings

Q: Can't write to disk?
A: Make the Disk to be IDE mode before installation.


Q: Guest OS (Android-x86) no eth0 interface?
A: Set the Network Device Model to be pcnet.


Tuesday, July 3, 2012

HowTo - Porting Android-x86 onto Qemu-KVM

Before you start, you need to install a lot of packages.  Please refer to

https://help.ubuntu.com/community/KVM/Installation

Generating a new virtual machine:

1. Create a file for storing Android-x86 disk image.

$ qemu-img create android-4.0.img 4G


2. Install the system from the cd image (the iso file).
$ kvm -m 2047 -cdrom your_iso_file.iso -hda android-4.0.img -boot d

Install the os to the disk as usual.

After creating a faked SD, do not reboot. Shut down the window.

4. Start the virtual machine.
$ sudo kvm -m 2047 -hda android-4.0.img -net nic,model=pcnet -net tap

For the file size, the numbers matter, so don't be stingy. 

Notice the net model should be pcnet and the second net should be tap. Tap requires root privilege. 

If you don't have a public bridge yet, you need to set up one first. Please refer to 


Briefly, if you are using Ubuntu, the network configuration can be done by doing the follows: (on the host)

# vi /etc/network/interfaces

# Replace old eth0 config with br0
auto eth0 br0
# Use old eth0 config for br0, plus bridge stuff
iface br0 inet dhcp
    bridge_ports    eth0
    bridge_stp      off
    bridge_maxwait  0
    bridge_fd       0
# /etc/init.d/networking restart


On the guest because you are actually using a virtual eth0 device, you need to modify your /etc/network/interfaces file to configure eth0. 


Sunday, May 13, 2012

HowTo - Porting Android 4.0 ICS onto x86 VirtualBox


Thanks to Android-x86 community.

1. Build environment

1.1 Install Java JDK 7 [1]
(1) Download Java JDK 7
(2) Unzip, rename as java-7-oracle
(3) Move it to /usr/lib/jvm
(4) Use this tool to change the system Java version to java-7-oracle

$ wget http://webupd8.googlecode.com/files/update-java-0.5b 
$ chmod +x update-java-0.5b
$ bash update-java-0.5b

1.2 Install required packages (Ubuntu 12.04) [2]

$ sudo apt-get install git-core gnupg flex bison gperf build-essential \
  zip curl libc6-dev libncurses5-dev:i386 x11proto-core-dev \
  libx11-dev:i386 libreadline6-dev:i386 libgl1-mesa-dev:i386 \
  g++-multilib mingw32 openjdk-6-jdk tofrodos python-markdown \
  libxml2-utils xsltproc zlib1g-dev:i386 libxext-dev:i386 lib32ncurses5-dev

2. Build the image

2.1 Download Android-x86 source file [3]

$ mkdir android-x86
$ cd android-x86
$ repo init -u http://git.android-x86.org/manifest -b ics-x86
$ repo sync

*ics-x86 is based on Android 4.0 release. If the above link fails, try git://android-x86.git.sf.net/gitroot/android-x86/x86/platform/manifest.git -b

2.2 Build

$ bash
$ source build/envsetup.sh
$ lunch

Choose eeepc-eng as target product (that is the only thing that compiles through).

$ m -j16 iso_img

*16 is the number of parallel threads which can be determined by cpu info.

2.3. Locate the generated image at

out/target/product/eeepc/eeepc.iso

3. Download and run VirtualBox

3.1 Configurations: [4]
  • OS Type: Linux 2.6
  • Base Memory: At least 256MB, 512MB is better.
  • CD/DVD-ROM image: eeepc.iso
3.2 Start
On the boot menu, select the VESA mode item. 
3.3 Usage [5]

4. Alternative option

For VirtualBox Android, try BuilDroid. It has a faked Wi-Fi connection, making things much easier.

Check my test on VirtualBox here.